Hosting of Web Files on SPI Flash File System
We will have to expose the web user interface thanks to an HTTP server that we will set up on the ESP32. It will have to be able to send to the client browser all the interface files we presented in the previous chapter, using the following HTTP routes:
http://esp32_ip_address/index.html
http://esp32_ip_address/index.css
http://esp32_ip_address/index.js
http://esp32_ip_address/favicon.ico
And rather than building these resources dynamically with C++ code (which is laborious and not very readable), we will host them in the Flash memory of the ESP32, on an appropriate file system: the SPIFFS.
How to upload the file system image
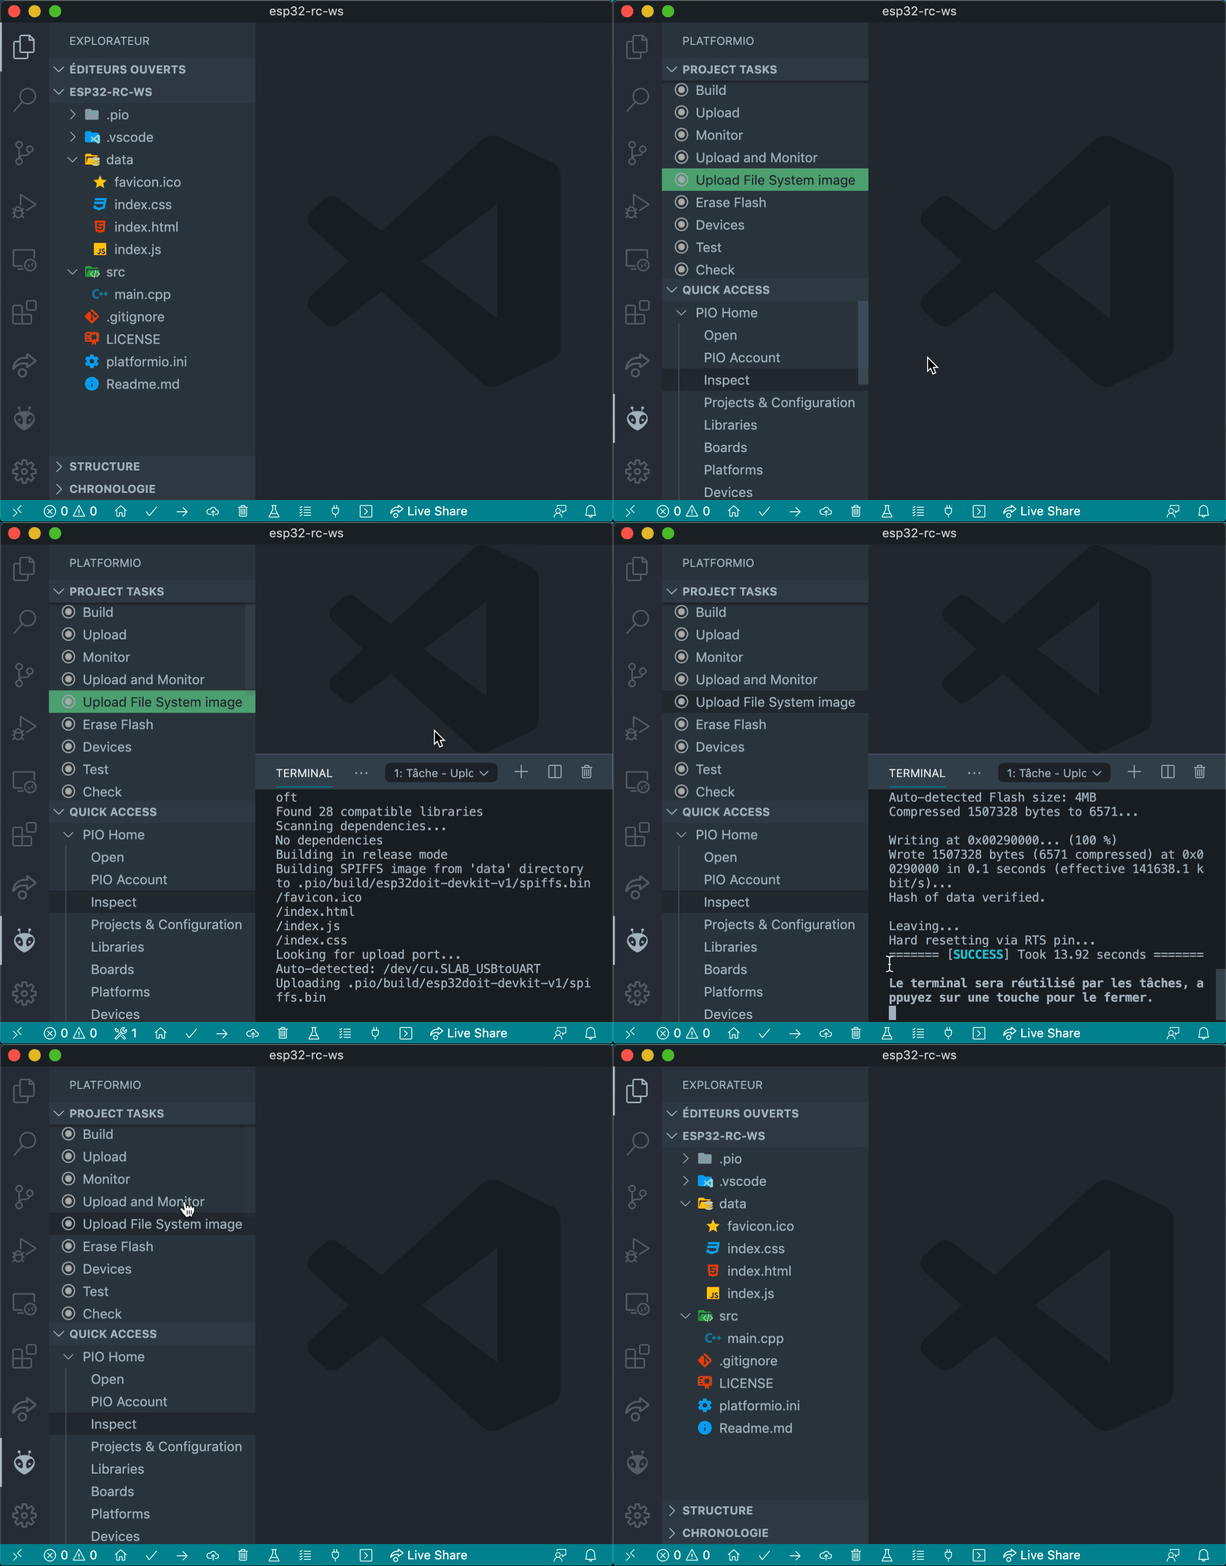
PlatformIO provides a tool that is very easy to use and makes it possible to build an image of the file system to be uploaded to the ESP32. It will indeed build this image with the contents of the data folder. This is why it is absolutely necessary that this folder is called data.

PlatformIO » Upload File System image
If you still want to use the Arduino IDE, I suggest you refer to the following tutorial:
Install ESP32 Filesystem Uploader in Arduino IDE
Preparing ESP32 to access SPIFFS
First of all, the SPIFFS library must be included at the beginning of the program:
#include <Arduino.h>
#include <SPIFFS.h>
Then let’s define the initSPIFFS() function to initialize the SPIFFS:
// ----------------------------------------------------------------------------
// SPIFFS initialization
// ----------------------------------------------------------------------------

void initSPIFFS() {
  if (!SPIFFS.begin()) {
    Serial.println("Cannot mount SPIFFS volume...");
    while(1) digitalWrite(LED_BUILTIN, millis() % 200 < 50 ? HIGH : LOW);
  }
}
If all goes well, the SPIFFS.begin() method returns true. Otherwise, an error message is displayed on the serial monitor and a fast blinking of the on-board LED is triggered to indicate that a problem has occurred. If your board doesn’t have one, you can ignore this feature.
A few remarks:
- We also need to think about initializing the serial monitor.
- Why not define the on-board LED exactly like the breadboard one?
Let’s start with the definition of the on-board LED as a Led component:
// ----------------------------------------------------------------------------
// Definition of global variables
// ----------------------------------------------------------------------------

Led    onboard_led = { LED_BUILTIN, false };
Led    led         = { LED_PIN, false };
Button button      = { BTN_PIN, HIGH, 0, 0 };
Then let’s rewrite the initSPIFFS() function:
// ----------------------------------------------------------------------------
// SPIFFS initialization
// ----------------------------------------------------------------------------

void initSPIFFS() {
  if (!SPIFFS.begin()) {
    Serial.println("Cannot mount SPIFFS volume...");
    while (1) {
        onboard_led.on = millis() % 200 < 50;
        onboard_led.update();
    }
  }
}
Now we can adapt the definition of the setup() function to initialize the serial monitor and activate the initialization of the SPIFFS:
// ----------------------------------------------------------------------------
// Initialization
// ----------------------------------------------------------------------------

void setup() {
    pinMode(onboard_led.pin, OUTPUT);
    pinMode(led.pin,         OUTPUT);
    pinMode(button.pin,      INPUT);

    Serial.begin(115200); delay(500);

    initSPIFFS();
}
It’s all good now! You can update the baseline project by going to the remote-control-with-websocket directory and executing the following git command:
git checkout v0.4
You can also download the updated main.cpp file and replace yours in your own project:
Here is the complete code for this chapter:
/**
 * ----------------------------------------------------------------------------
 * ESP32 Remote Control with WebSocket
 * ----------------------------------------------------------------------------
 * © 2020 Stéphane Calderoni
 * ----------------------------------------------------------------------------
 */

#include <Arduino.h>
#include <SPIFFS.h>

// ----------------------------------------------------------------------------
// Definition of macros
// ----------------------------------------------------------------------------

#define LED_PIN 26
#define BTN_PIN 22

// ----------------------------------------------------------------------------
// Definition of global constants
// ----------------------------------------------------------------------------

const uint8_t DEBOUNCE_DELAY = 10; // in milliseconds

// ----------------------------------------------------------------------------
// Definition of the LED component
// ----------------------------------------------------------------------------

struct Led {
    // state variables
    uint8_t pin;
    bool    on;

    // methods
    void update() {
        digitalWrite(pin, on ? HIGH : LOW);
    }
};

// ----------------------------------------------------------------------------
// Definition of the Button component
// ----------------------------------------------------------------------------

struct Button {
    // state variables
    uint8_t  pin;
    bool     lastReading;
    uint32_t lastDebounceTime;
    uint16_t state;

    // methods determining the logical state of the button
    bool pressed()                { return state == 1; }
    bool released()               { return state == 0xffff; }
    bool held(uint16_t count = 0) { return state > 1 + count && state < 0xffff; }

    // method for reading the physical state of the button
    void read() {
        // reads the voltage on the pin connected to the button
        bool reading = digitalRead(pin);

        // if the logic level has changed since the last reading,
        // we reset the timer which counts down the necessary time
        // beyond which we can consider that the bouncing effect
        // has passed.
        if (reading != lastReading) {
            lastDebounceTime = millis();
        }

        // from the moment we're out of the bouncing phase
        // the actual status of the button can be determined
        if (millis() - lastDebounceTime > DEBOUNCE_DELAY) {
            // don't forget that the read pin is pulled-up
            bool pressed = reading == LOW;
            if (pressed) {
                     if (state  < 0xfffe) state++;
                else if (state == 0xfffe) state = 2;
            } else if (state) {
                state = state == 0xffff ? 0 : 0xffff;
            }
        }

        // finally, each new reading is saved
        lastReading = reading;
    }
};

// ----------------------------------------------------------------------------
// Definition of global variables
// ----------------------------------------------------------------------------

Led    onboard_led = { LED_BUILTIN, false };
Led    led         = { LED_PIN, false };
Button button      = { BTN_PIN, HIGH, 0, 0 };

// ----------------------------------------------------------------------------
// SPIFFS initialization
// ----------------------------------------------------------------------------

void initSPIFFS() {
  if (!SPIFFS.begin()) {
    Serial.println("Cannot mount SPIFFS volume...");
    while (1) {
        onboard_led.on = millis() % 200 < 50;
        onboard_led.update();
    }
  }
}

// ----------------------------------------------------------------------------
// Initialization
// ----------------------------------------------------------------------------

void setup() {
    pinMode(onboard_led.pin, OUTPUT);
    pinMode(led.pin,         OUTPUT);
    pinMode(button.pin,      INPUT);

    Serial.begin(115200); delay(500);

    initSPIFFS();
}

// ----------------------------------------------------------------------------
// Main control loop
// ----------------------------------------------------------------------------

void loop() {
    button.read();

    if (button.pressed()) led.on = !led.on;

    led.update();
}